Table of Contents
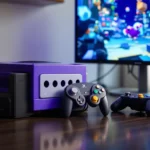
ToggleYou’ve got a Nintendo Switch, and chances are it lives somewhere between handheld mode on the couch and docked mode on your main display. But what happens when you want to dock at a friend’s place, need a second setup upstairs, or your original dock just isn’t cooperating? That’s where the Nintendo Switch Dock Set comes in, a complete package that’s more than just a plastic cradle.
Whether you’re looking to replace a damaged dock, set up a dual-station gaming environment, or finally understand what makes the official dock set tick, this guide walks through everything you need to know. From what’s actually included in the box to troubleshooting stubborn display issues, we’re covering the practical details that matter in 2026.
Key Takeaways
- A Nintendo Switch Dock Set is a complete package including the dock, HDMI cable, and AC adapter—all necessary components for docking your console to a TV or monitor.
- Official dock sets guarantee compatibility and proper power delivery at $59.99, while third-party alternatives carry bricking risks and warranty complications that make the premium worth protecting your $300+ investment.
- Setting up your dock correctly—connecting power first, then HDMI—prevents detection issues, and enabling Game Mode on your TV reduces input lag by 50-100ms for a more responsive gaming experience.
- Multiple dock sets make sense if you’re managing different gaming stations across rooms, traveling frequently, or replacing lost or damaged components, eliminating the hassle of moving cables between locations.
- Regular maintenance like compressed air cleaning every 2-3 months and loose cable coiling extends your dock’s lifespan, while avoiding the Nintendo Switch Dock Set entirely only works for Switch Lite owners, whose consoles are handheld-only.
- Best deals on official dock sets appear during Black Friday, Cyber Monday, and holiday sales with $10-15 discounts, but prices significantly below $55 typically indicate refurbished or third-party units.
What Is the Nintendo Switch Dock Set?
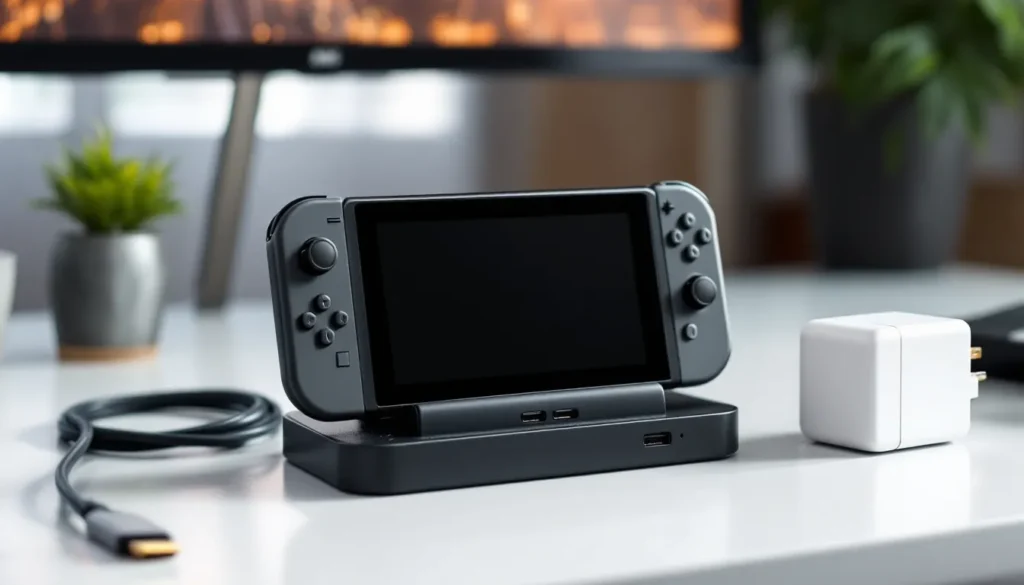
The Nintendo Switch Dock Set is Nintendo’s official accessory package designed to let players connect their Switch console to a TV or monitor. It’s not just the black dock you place the console into, it’s a complete kit with all the necessary cables and adapters to get video and power running.
Unlike a standalone dock (which is just the plastic housing), the dock set includes everything you’d need to recreate your full docked experience from scratch. It’s the same setup that ships with a new Switch console, sold separately for those who need extras or replacements.
What’s Included in the Official Dock Set Package
When you purchase an official Nintendo Switch Dock Set, you’re getting:
- Nintendo Switch Dock – The main unit with USB ports and connection terminals
- HDMI Cable – For video and audio output to your display (1.5m length)
- Nintendo Switch AC Adapter – The power supply (model HAC-002, outputting 5V/1.5A and 15V/2.6A)
This trio covers all the essentials. The dock itself features three USB 2.0 ports (two on the outside, one inside), an HDMI output port, and the USB-C power input on the back.
One thing to note: the dock set works with all Switch models, original Switch (2017), Switch v2 (2019 with better battery), and the OLED model (2021). The OLED Switch originally came with a slightly redesigned dock featuring a built-in LAN port, but the standard dock set sold separately uses the 2017-2019 design. If you need ethernet, you’ll want to grab a USB-to-LAN adapter separately.
How the Dock Set Differs from Standalone Docks
Here’s where things get specific. If you see “Nintendo Switch Dock” listed alone on a retailer’s site, double-check what you’re actually buying.
Standalone dock typically means just the plastic dock unit itself, no cables, no AC adapter. These occasionally pop up on Nintendo’s refurbished store or third-party sellers, usually at a lower price point ($40-50 vs. $60 for the full set as of 2026). The problem? If you don’t already have spare cables lying around, you’ll need to purchase those separately, which quickly erases any savings.
Dock set includes everything. It’s plug-and-play ready out of the box. For most players, especially those setting up a new station or replacing lost components, the dock set is the smarter purchase.
The official dock set also guarantees Nintendo’s quality standards. The AC adapter delivers the exact power profile the Switch needs, and the HDMI cable is tested for the console’s specific output specs (1080p at 60Hz for standard Switch, same for OLED even though the handheld screen upgrade).
Why You Might Need an Extra Nintendo Switch Dock Set
Not everyone needs multiple dock setups, but once you’ve experienced the convenience, it’s hard to go back. Here are the scenarios where a second (or third) dock set actually makes sense.
Setting Up Multiple Gaming Stations
The most common use case: different rooms, different displays. Maybe you’ve got a main TV in the living room but also a monitor in your bedroom or home office. Carrying the dock back and forth every time you want to switch locations gets old fast, especially when you’re dealing with cable management behind an entertainment center.
With dedicated docks at each station, you just grab your console and go. Pop it in, and you’re gaming within seconds. No fumbling with cables, no risk of leaving something behind or damaging connectors from repeated plugging and unplugging.
This setup is particularly useful for households with multiple players. If you’ve got two Switches in the house (say, yours and a partner’s or sibling’s), having separate dock stations means both consoles can stay ready to play on different displays without constant swapping.
Travel and Portability Convenience
The Switch is marketed as a portable console, but “portable” means different things to different players. If you frequently visit friends or family and want to bring your gaming setup, lugging your entire home dock setup isn’t ideal, but going handheld-only limits the experience.
A dedicated travel dock set solves this. Keep one at home permanently wired into your main setup, and pack the second for trips. You’ll have everything you need in one compact bundle: dock, cables, adapter. When you arrive, setup takes minutes.
Some players even keep a dock set at a regular gaming spot, a friend’s place, a significant other’s apartment, a college dorm during the school year. It eliminates the “did I remember the HDMI cable?” panic and ensures you’re always ready for couch co-op or multiplayer sessions on the big screen.
Replacement for Lost or Damaged Components
Let’s be real: stuff breaks, goes missing, or stops working. The AC adapter is a common casualty, those cables can fray, and the adapter brick itself can fail after years of use. HDMI cables get bent, stepped on, or claimed by cable management gremlins.
If your original dock set is having issues, a replacement dock set gets you back up and running immediately. Players who’ve experienced charging port problems know how frustrating power delivery issues can be, sometimes the dock itself is the culprit, and a fresh unit resolves connectivity problems.
Buying the complete set also future-proofs you against single-component failures. If your HDMI cable dies six months after buying a standalone dock, you’re back to shopping. With the full set, you’ve got spares or at least a working backup configuration.
How to Set Up Your Nintendo Switch Dock Set
Setting up a Nintendo Switch Dock Set is straightforward, but getting it right the first time saves you troubleshooting headaches later.
Step-by-Step Installation Process
Here’s the proper connection sequence, which matters more than you’d think:
-
Open the back panel of the dock by lifting the small cover. You’ll see three ports: AC adapter (top), USB (middle), and HDMI (bottom).
-
Connect the AC adapter first. Plug the USB-C end into the top port labeled “AC ADAPTER,” then plug the adapter into a wall outlet. This establishes power before anything else.
-
Connect the HDMI cable. Plug one end into the bottom port on the dock, then connect the other end to your TV or monitor’s HDMI input. Make note of which HDMI port you’re using (HDMI 1, 2, etc.).
-
Close the back panel. This keeps cables secure and prevents accidental disconnection.
-
Place your Switch console into the dock. Align the USB-C connector on the console with the dock’s connector inside. The console should slide in smoothly, if you’re forcing it, check the alignment.
-
Check your TV input. Switch your display to the correct HDMI input. The Switch screen should go black (it disables in docked mode), and your TV should show the Switch home screen within 2-3 seconds.
Connection order matters because the dock needs power before it can establish an HDMI handshake with your display. Plugging HDMI in first occasionally causes detection issues.
Troubleshooting Common Connection Issues
Not getting video? Here’s the quick diagnostic checklist:
No display output at all:
- Verify the AC adapter is properly connected and the wall outlet is live
- Try a different HDMI port on your TV
- Ensure your TV is set to the correct input source
- Check that the console is fully seated in the dock (you should hear a subtle click)
- Try removing and reinserting the console
Intermittent connection or black screen flickers:
- Inspect the HDMI cable for damage or bent connectors
- Clean the USB-C connector inside the dock with compressed air (power off first)
- Check for debris or lint in the console’s USB-C port
- Test with a different HDMI cable if available
Console charges but won’t display video:
- This suggests the AC adapter is working but the HDMI connection isn’t. Try the dock with a different display if possible to isolate whether it’s the dock or the TV.
- Some older TVs have HDCP compatibility issues: try disabling HDCP in the TV settings if that option exists.
- If issues persist after trying multiple cables and displays, the dock’s internal video circuitry may be faulty.
Display works but resolution looks wrong:
- Navigate to System Settings > TV Settings > TV Resolution and ensure it’s set to “Automatic” or manually select 1080p
- Some TVs default to incorrect picture modes for the Switch: check your TV’s picture settings for the HDMI input
If you’ve run through these steps and still can’t get video output, the dock unit itself may be defective. Nintendo’s customer support can verify this with additional diagnostics, and docks are covered under the standard one-year warranty.
Official vs. Third-Party Dock Sets: What You Need to Know
Third-party docks have flooded the market since the Switch launched in 2017, promising smaller footprints, additional features, or lower prices. But are they worth the risk? Here’s the breakdown.
Safety and Compatibility Concerns
Let’s start with the elephant in the room: third-party docks have bricked Switch consoles. It’s rare, but it happens. The issue stems from how the Switch handles power delivery and video output through its USB-C port, it doesn’t strictly follow USB-C Power Delivery (PD) standards, instead using a semi-proprietary protocol.
Early third-party docks (2017-2018) caused the most problems, particularly after system firmware updates. Nintendo’s firmware 5.0.0 in March 2018 was notorious for rendering some third-party docks incompatible or causing consoles to fail. While many third-party manufacturers have since improved their designs, the risk hasn’t been completely eliminated.
Physical issues also pop up. Some third-party docks use tighter tolerances or different connector angles that can stress the Switch’s USB-C port over time. Given that charging port issues already affect some consoles through normal wear, adding extra stress from ill-fitting docks accelerates potential failure.
Official dock sets eliminate these concerns entirely. Nintendo designed the dock specifically for the Switch’s power and video requirements. There’s no guesswork, no compatibility roulette, and no risk of bricking your console from a firmware update.
Price Comparison and Value Analysis
As of 2026, the official Nintendo Switch Dock Set typically retails for $59.99 USD. Third-party alternatives range from $25-45 for basic docks, up to $60-80 for feature-rich versions with additional USB ports, ethernet, or portable designs.
On paper, that $25-30 savings looks tempting. But factor in:
- Replacement risk: A bricked Switch costs $200-350 to replace (depending on model and whether you buy new or refurbished)
- Warranty voids: Using unauthorized accessories can complicate warranty claims if something goes wrong
- Cable quality: Cheaper third-party sets often include subpar HDMI cables or power adapters that don’t meet the Switch’s specs
Some premium third-party docks offer legitimate advantages, compact travel designs, built-in ethernet, more USB ports, or the ability to use standard USB-C PD chargers. If you’re specifically after those features and buy from a reputable manufacturer (Genki, Skull & Co, and BASSTOP have better track records), the risk decreases. Just understand you’re still accepting more risk than an official dock.
For most players, the official dock set is the smart buy. You’re paying for guaranteed compatibility, proper power delivery, and peace of mind. That’s worth $30-40 over gambling on third-party hardware, especially when your entire Switch library is at stake.
Warranty and Support Differences
The official Nintendo Switch Dock Set comes with Nintendo’s standard one-year limited warranty covering manufacturing defects. If the dock fails, Nintendo will repair or replace it at no charge during the warranty period. After that, you can purchase repairs through Nintendo’s support system or buy a new dock set.
Third-party docks vary wildly. Some manufacturers offer 30-90 day warranties: others provide a year or more. The catch is enforcement, getting a replacement from a third-party seller (especially overseas manufacturers selling through Amazon or eBay) can be a hassle involving return shipping costs and weeks of waiting.
More importantly, if a third-party dock damages your Switch console, you’re stuck. Nintendo’s warranty explicitly doesn’t cover damage from unauthorized accessories. The third-party manufacturer might cover it, but good luck proving the dock caused the issue and fighting for a $300+ replacement.
Official dock sets also integrate seamlessly with Nintendo’s customer support. If you’re troubleshooting display issues or power problems, support reps can walk through solutions knowing exactly what hardware you’re using. With third-party gear, you’re often on your own.
Optimizing Your Dock Set for the Best Gaming Experience
You’ve got the dock connected and working. Now let’s dial in the settings and setup to get the best possible performance.
Display Settings and Resolution Output
The Nintendo Switch outputs 1080p at 60Hz when docked (for both the original and OLED models, the OLED’s upgraded screen only affects handheld mode). Here’s how to optimize it:
TV Resolution Settings:
- Go to System Settings > TV Settings > TV Resolution
- Set to “Automatic” for most setups, the Switch will negotiate the best resolution with your display
- If you experience display issues, manually select “1080p” or “720p” depending on your TV’s capabilities
- The Switch doesn’t support 4K output: it’ll upscale on a 4K TV, but native rendering stays at 1080p
RGB Range:
- System Settings > TV Settings > RGB Range
- “Automatic” works for most modern displays
- If colors look washed out or crushed, try switching between “Full” and “Limited”
- Full Range (0-255): Better for PC monitors
- Limited Range (16-235): Better for most TVs
TV Sound:
- System Settings > TV Settings > TV Sound
- Choose “Surround Sound” if you have a home theater system: otherwise stick with “Stereo”
Game Mode on your TV:
This is crucial but often overlooked. Most modern TVs have a “Game Mode” setting that reduces input lag by bypassing image processing. According to testing from display experts, enabling game mode can cut input lag by 50-100ms, which makes a noticeable difference in reaction-heavy games like Smash Bros or Splatoon 3.
Access this through your TV’s picture settings (location varies by brand). Once enabled for your Switch’s HDMI input, the console will feel more responsive.
Cable Management and Positioning Tips
Proper cable management and dock positioning prevent wear and make your setup cleaner:
Dock placement:
- Position the dock vertically on a flat, stable surface with adequate ventilation
- Leave at least 4 inches of clearance around the dock for airflow, the Switch generates heat when docked
- Avoid enclosed entertainment centers without ventilation: the console can thermal throttle if it overheats
- Keep the dock away from direct sunlight or heat sources
Cable routing:
- Use the dock’s back panel to secure cables and prevent strain on connectors
- Avoid sharp bends in the HDMI cable, this can damage internal wiring
- If routing cables through furniture, leave some slack to prevent tugging when you remove the console
- Consider cable clips or ties to keep things tidy, but don’t compress cables too tightly
Insertion and removal:
- When docking, lower the console straight down, don’t angle it in from the side
- When removing, grip the console firmly and pull straight up
- Never yank the console out at an angle, as this stresses the USB-C connector
For travel setups:
If you’re using a dock set for portable gaming, invest in a small electronics organizer or case. Coil cables loosely (no tight wraps), and pad the dock to prevent scratches. Some players keep their travel dock set in a hard-shell case with cut foam, it’s overkill for casual use but perfect if you’re frequently moving your setup.
Where to Buy the Nintendo Switch Dock Set in 2026
Finding an official dock set is generally straightforward, but knowing where to look ensures you get the best price and avoid counterfeits.
Official Retailers and Authorized Sellers
Nintendo’s Official Store:
- Nintendo’s online store sells the dock set directly for $59.99
- Guarantees authentic product and full warranty coverage
- Shipping is reliable, though not always the fastest option
Major Retailers:
- Amazon – Stocks the official dock set, but watch for third-party sellers. Buy from “Ships from and sold by Amazon.com” to ensure authenticity
- Best Buy – Regularly stocks dock sets both online and in-store: price matches with competitors
- Target – Often runs promotions: check for Circle rewards offers
- Walmart – Consistent stock online: in-store availability varies by location
- GameStop – Typically has dock sets, and PowerUp Rewards members occasionally get discounts
Regional retailers like Micro Center (US) or EB Games (Canada/Australia) also carry official dock sets. According to retail tech guides, checking local stock online before heading to a physical store saves time, especially for accessories that may not be displayed prominently.
What to watch for:
- Verify you’re buying the “Nintendo Switch Dock Set (HAC-010)” with all three components
- Check that packaging is factory-sealed
- Be wary of prices significantly below $55, deep discounts often indicate third-party or refurbished units
Finding the Best Deals and Discounts
While dock sets don’t go on sale as frequently as games, you can snag deals if you time it right:
Best times to buy:
- Black Friday / Cyber Monday – Expect $10-15 off (typically $44.99-49.99)
- Holiday sales (December) – Similar discounts, sometimes bundled with other accessories
- Back to school sales (August-September) – Occasional $5-10 off
- Prime Day (Amazon, usually July) – Hit or miss, but worth checking
Discount strategies:
- Use retailer rewards programs (Target Circle, Best Buy Rewards, etc.) for 5-10% back
- Stack credit card rewards with retail discounts where possible
- Check refurbished sections: Nintendo occasionally sells refurbished dock sets for $49.99 through their online store with a 1-year warranty
- Sign up for price alerts on sites like CamelCamelCamel (for Amazon) or use browser extensions like Honey
Used market caution:
Facebook Marketplace, eBay, and local sellers often have dock sets for $30-45. The risk is condition and completeness. If buying used:
- Verify all three components are included
- Ask if the seller can demonstrate it working
- Inspect the AC adapter’s cable for fraying
- Check the dock’s USB-C connector for damage
For $10-15 in savings, the risk often isn’t worth it unless you’re buying from someone you trust. A faulty used AC adapter can damage your console, and you’ll have zero recourse.
International buyers:
The Switch is region-free, but power adapters vary by region. A US dock set uses 120V AC adapters: a European set uses 230V. The dock and HDMI cable work worldwide, but make sure the AC adapter matches your region’s voltage, or use an appropriate adapter/converter.
Caring for and Maintaining Your Dock Set
Dock sets are relatively low-maintenance, but a little care extends their lifespan and keeps your gaming sessions hassle-free.
Regular cleaning:
- Dock interior: Dust and debris accumulate inside the dock, especially around the USB-C connector. Every 2-3 months, power off and unplug the dock, then use compressed air to blow out the interior. Hold the can upright to avoid moisture.
- USB-C connector: Use a dry, soft-bristled brush (like a clean toothbrush) to gently clean around the connector teeth. Never use metal tools or liquids.
- Exterior: Wipe down the dock with a slightly damp microfiber cloth. Avoid harsh cleaners or abrasives.
Cable care:
- Avoid wrapping cables tightly: this stresses internal wiring. Use loose coils or over-under cable wrapping techniques.
- Inspect cables every few months for fraying, especially near connectors where stress is highest.
- If you notice the AC adapter brick getting excessively hot during use, unplug it and contact Nintendo, overheating adapters can fail or become fire hazards.
Storage:
If you’re storing a dock set long-term (seasonal travel setup, backup unit, etc.):
- Keep it in a cool, dry location away from direct sunlight
- Store cables loosely to prevent permanent kinks
- Consider a dust cover or storage bag to protect the dock’s interior connector
Common wear points:
- The USB-C connector inside the dock takes the most wear. If you notice your console becoming harder to dock or the connection feeling loose, inspect for bent pins (visible with a flashlight). Bent pins usually require professional repair or dock replacement.
- The AC adapter cable is the second most common failure point. If the cable jacket splits or frays, replace the adapter immediately. Don’t tape over damaged cable insulation, that’s a shock and fire hazard.
Environmental considerations:
Avoid using the dock in high-humidity environments (like bathrooms) or extremely dusty conditions. Moisture can corrode internal contacts, and excessive dust buildup can interfere with both electrical connections and cooling.
For players conducting internal repairs or teardowns, note that the dock itself is mostly passive hardware, the Switch console handles the video processing. The dock mainly routes power and signals, so there’s limited user-serviceable internals beyond the external ports.
Frequently Asked Questions About Nintendo Switch Dock Sets
Let’s tackle the most common questions that come up when dealing with dock sets.
Can I Use Any USB-C Cable with My Dock?
Short answer: No, don’t risk it.
Longer answer: The Nintendo Switch AC adapter uses a USB-C connector, but it doesn’t follow standard USB-C Power Delivery specs. It outputs 15V/2.6A when the Switch is docked, which isn’t a standard USB PD voltage profile. Most USB-C chargers output 5V, 9V, or 20V.
Using a random USB-C cable and charger might work for charging the console in handheld mode (5V/1.5A), but it often won’t provide enough power for docked mode. You’ll get a “Not enough power” warning, the console won’t charge while playing, or video output will fail entirely.
Stick with the official Nintendo Switch AC adapter (model HAC-002) or a confirmed-compatible third-party charger that explicitly supports the Switch’s power profile. Generic USB-C phone or laptop chargers aren’t designed for this and can cause issues ranging from slow charging to potential hardware damage.
Will the Dock Work with All Switch Models?
Yes, with a small caveat. The official Nintendo Switch Dock Set works with:
- Original Nintendo Switch (2017, model HAC-001)
- Nintendo Switch v2 (2019, model HAC-001(-01) with improved battery)
- Nintendo Switch OLED (2021, model HEG-001)
The dock connector and power delivery are identical across all three models. The OLED Switch came with a revised dock featuring a built-in ethernet port, but the console itself works perfectly fine with the older dock design sold in the standard dock set.
It does NOT work with the Nintendo Switch Lite. The Switch Lite lacks the hardware needed for docked mode, no video output circuitry, and the console doesn’t physically fit in the dock. The Lite is handheld-only by design.
How Do I Fix a Dock That Won’t Display Video?
Run through this diagnostic sequence:
-
Verify power: Ensure the AC adapter is connected and the dock’s LED briefly lights green when you insert the console.
-
Check HDMI connection: Try a different HDMI cable and a different HDMI port on your TV. If possible, test with a completely different display.
-
Test the console: Restart your Switch by holding the power button for 3 seconds and selecting “Power Options > Restart.” Sometimes a soft lock prevents video output.
-
Inspect physical connections: Remove the console and check the USB-C connector inside the dock for bent pins or debris. Use compressed air to clean.
-
Try different docking: Remove the console completely, wait 30 seconds, then re-dock it firmly. Some users report that a “cold dock” (unplugging AC adapter for 30 seconds before reconnecting) resolves handshake issues.
-
Update system software: Ensure your Switch is running the latest firmware (go to System Settings > System > System Update while in handheld mode).
-
Factory reset (last resort): System Settings > System > Formatting Options > Initialize Console Without Deleting Save Data. This won’t erase your games or saves but resets system settings.
If none of these steps work, the issue is likely hardware failure in either the dock (most common) or the Switch’s video output circuitry (rare but possible). Players experiencing persistent charging or power problems should verify the console itself is functioning properly before assuming it’s a dock issue. Nintendo’s customer support can run additional diagnostics and arrange repairs or replacements if the unit is under warranty.
Conclusion
The Nintendo Switch Dock Set isn’t the flashiest accessory in your gaming arsenal, but it’s one of the most practical. Whether you’re setting up a dedicated station in every room, need a reliable travel solution, or replacing a worn-out unit, the official dock set delivers the guaranteed compatibility and peace of mind that third-party alternatives can’t match.
Setup is straightforward, troubleshooting is manageable, and with proper care, a dock set will serve you for years. The $60 price tag might feel steep compared to budget alternatives, but when you’re protecting a $300+ console and your entire game library, it’s a reasonable investment.
Now go dock that Switch and get back to gaming.